All Chocolate Weekend


I know it’s hard to picture but there IS such a thing as too much chocolate.

This weekend I finally made the cake pictured above for my dear friend’s birthday. I had made the cake before and it came out great taste-wise but it’s look were a bit sub-par. My friend’s birthday was in May and we’ve been trying to get together before and since. Trying to coordinate people’s social calendars is a pain.

The cake is from a recipe in Pure Chocolate.  The recipe is called ‘Blanc et Noir’ for obvious reasons. It’s a fantastic concoction of dark and white chocolate. The cake itself is a flourless chocolate cake. The filling is a white chocolate ganache. And the outer coating is a dark chocolate ganache. It would be hard to imagine cramming more chocolate per mouthful. Even the decorative swirls on top are done with white chocolate.

Making the cake is a two day process. The cake is made first and then must cool for at least 4 hours (or overnight) in the refrigerator. The white chocolate ganache also needs to be made in advance as it needs an overnight sit on the counter to setup properly. These two steps were done on Friday night after work.

The cake comes together fairly straightforwardly but there’s a lot of folding and chocolate melting. Last time I made it I used a stainless steel bowl set over a simmering pot of water to melt the chocolate and this required a lot of standing over the pot and stirring to ensure that the chocolate didn’t burn. This time I decided to try the microwave. Normally, I adopt a snooty attitude about using the microwave for “fine” baking. I *have* to do it “right”…from scratch…the old-fashioned way. Eh. Melting is melting. And, if you’re careful and do the melting in small increments, it works just fine. There was still plenty of hand mixing to do when it came to folding the whipped egg whites and sugar into the melted chocolate, butter, sugar mixture.

It’s a pretty heavy batter but it looks (okay, and it tastes) fantastic.   The heavy chocolate, sugar, egg yolk mixture is lightened with lots of folding of stiff egg whites (beaten with sugar).

The batter goes in a buttered, parchment lined and rebuttered quarter-sheet pan.  I diagonally cut the corners of the parchment and overlap to get nice crisp corners.  The batter is smoothed into the pan making sure that you get it even and the edges and corners have an equal amount of batter.  (Last time I didn’t pay enough attention to the corners and edges and they came out too thin and brittle).

I use pretty high end chocolate for my chocolate concoctions (in this case El Rey and Guittard for the cake, Valrhona white chocolate for the filling and Scharfenberger for the dark chocolate ganache). I may be rethinking this after the later developments of my chocolate weekend.

Once the cake was in the oven, I proceeded to the white chocolate ganache. Ganache is surprisingly easy to make. Heat some cream to just boiling and dump in a bunch of chocolate. Let the chocolate warm for a minute and then mix together. You need to make sure the cream is well heated so all the chocolate can get warm enough to melt. Stir until all chocolate is melted and then cover with plastic wrap touching the surface (to prevent a skin forming). Just leave it on the counter overnight to setup.

The only bad part about making this wonderful confection is the cleanup. It creates a LOT of cleanup: bowls, pans, counters, utensils all covered in dark chocolate. Although there are a lot of things to wash they do clean up pretty easily (chocolate melts off in hot water) compared to cleaning up after making bread. Dough does not melt…it clumps.

The cake bakes for about 45 minutes and then it briefly cools on a wire rack in the pan. Then it’s placed in the refrigerator for at least 4 hours (or overnight – if overnight wrap it completely in plastic after it’s been in the frig for an hour or so).

The next day is mostly assembly.  First the dark chocolate ganache is prepared by heating a cup of cream and pouring it over 8 ounces of dark (I used 66% El Rey) chocolate. I gave it a minute to get melty and then stirred (and stirred and stirred) to get a smooth velvety consistency. 1/4 cup is placed in the frig to harden up a bit while the rest is left to cool down and reach a thick, pourable consistency.

The cake is removed from the pan by inverting another pan on top of it, flipping the whole thing over and then removing the parchment paper. Now for the construction! Carefully measure the cake (it shrinks some when cooled) and figure out the widths for three even pieces (from the length of the cake). In my case, the cake had shrunk to about 11 1/2″ in length so I made each piece 3 3/4″ by measuring and putting a toothpick in to mark the spot. Then I used a T-square to get nice perpendicular cuts. Now you have the three cake layers.

The white chocolate ganache should be the consistency of warm butter (not melted but gooey) after setting up overnight. It gets whipped in the mixer to create a light mixture to use as the filling. I created a base for the cake by cutting a 4″X8″ piece of cardboard. Then I cut a larger piece of cardboard and covered it in parchment paper to make a foundation to put the cake on. It looks nicer that way and is easier to handle.

I placed one layer on the 4X8 cardboard and then cover with 1/2 the filling. I made sure the filling went all the way out to the edges so that, when sliced, each piece would have an identical look and the finishing ganache covering would be even. Then the middle layer went on, followed by the other 1/2 of the filling and then topped by the third layer.

By this time, the 1/4 cup of dark chocolate ganache had setup a bit too much (it was solid). So I gave it a quick nuke (20 seconds) and it returned to a spreadable consistency. This bit of ganache is used to make a crumb coat on the layered cake in preparation for covering completely in ganache. Once the crumb coat was complete I turned to the ganache which seemed a bit clumpy when I checked it. So this went on top of a pot of simmering water to warm it a bit. It was about 94 degrees when I felt it was ready for pouring.

To be ready for the final decoration step, I melted 2 ounces of white chocolate (I just used Candy Melts since it’s such a small quantity) in the microwave and then added 2 tablespoons of oil (so it doesn’t harden too quickly). Now for the ganache pour!

The setup for pouring ganache is also easy. I just set out a (non-stick) pan, place a rack over it and then set the cake (on it’s little cardboard) onto the rack. First I pour the ganache around the edges of the top making sure the sides get a good coating. Then I pour along the top and use an offset spatula to smooth and allow the ganache to run over the sides. The smell is heaven!

Once the cake is complete covered you have to work pretty quickly. I had prepared a small parchment paper cone and loaded the white chocolate/oil mix into it. I quickly cut a very small hole in the tip and made three parallel lines down the top of the cake. Then, using a toothpick, I made figure eights through the lines to create the swirls. Simple!

The cake was served to our friends that evening and pronounced delectable. But wait! There was more chocolate to come. My husband likes to take treats to work for his colleagues. This week there was a request for brownies (with nuts) and fudge (without nuts). The brownies were made first and came together easily and deliciously. The fudge. Oy. The fudge. That turned into the most horrible, inedible mess I have ever created. Who knew that fudge was that hard to make!? Of course, forgetting a key ingredient (like milk) in the recipe certainly didn’t help. Nor did letting it get too hot. Again, who knew the when you let chocolate/sugar syrup heat up too much it turns into rock hard candy that you can only get out of the pot with a chisel?!! And then you have the privilege of throwing away a pound of very expensive chocolate along with everything else.

Undefeated I’m going to pick up a digital candy thermometer today and the fudge and I will be going at it again. We’ll see who survives.

Turning Cherries Upside Down

A wonderful, busy weekend!  My beautiful daughter, Cassie, was in town for the weekend and that always makes for a wonderful time for me (and I think for her too).  One of the great delights of parenthood is having adult children who you really like.  I am lucky enough to like all my children but there is a special relationship between mothers and daughters.  Especially since my daughter and I are so very much alike.  Even though we don’t look much alike, our personalities, verbal and facial expressions, mannerisms, world-view and sense of humor are practically identical.  Our communications are so easy because we intuitively “get” each other.

Cass was going to a get together at an old friend’s place.  She was very enthusiastic about baking some things to take.  After polling a bit on Facebook, the consensus wanted chocolate and peanut butter preferably in cookie form.

This was fine with me!  I had also had my eye on a recipe for a Cherry Upside –Down Cake and hadn’t really have a good enough reason to tackle it so this provided a perfect excuse.  So we decided on Oatmeal Peanut Butter Chocolate Chip cookies based on a recipe from the Martha Stewart Cookies book AND the cherry cake.

I made the cherry cake while they were out looking at houses.  I based it on a recipe in Rustic Fruit Desserts: Crumbles, Buckles, Cobblers, Pandowdies, and More but increased the size since it was for a large’ish group (plus I wanted to keep some for us).  Cass had the foresight to bring 1 ½ of cherries on the plane from Seattle.  So we had “genuine” Washington bing cherries.  I had recently acquired an OXO cherry pitter that had been waiting for the right opportunity.  We made quick work of pitting those cherries on Friday night (her boyfriend was tasked with eating any cherries that were incompletely pitted…he made an excellent garbage disposal).

The recipe starts out with one of the trickiest bits: making a caramel sauce.  While not particularly difficult since it’s just mixing up some sugar, butter and liquid and heating it up, it does require vigilance as the heated sugar can quickly go from a lovely amber caramel to a horrible, burned, sticky mess.  Making such things underscores the need for patience in baking and cooking (and life).  Keeping the heat under the pan moderate enables one the control the process but can really try one’s nerves if one doesn’t have a patient nature (or hasn’t cultivated one).  And, I must admit, this one hasn’t.  Patience is a virtue that I have managed to eschew for a long, long time.  So standing there, stirring and watching sugar boil (a process very similar to watching paint dry or grass grow), was the most difficult part of the recipe.

Once the sugar concoction had reached a deep (but not burned) amber color, it was poured into a pan pre-prepared with a butter coating (even though I was using a non-stick pan I buttered it well since I wanted to make sure the cake would easily slide out when flipped).  The caramel was left to cool in the pan for 5-10 minutes and then I began the process of lining up the cherries in the caramel.  It took a bit of time to make sure the cherries were uniformly distributed with pitted side up (so the prettier un-pitted side would on top once the cake was complete).  I used a 9X13” pan and, it was another trial of patience to line those cherries up across the entire pan.

Now that the cherries were all marching together through the caramel, it was time to make the cake.  The cake batter used the creaming method but with the twist of using egg yolks and sour cream for the liquid and then folding in whipped egg whites to really lighten the texture.  The batter was a really smooth, thick texture.  I carefully piled it onto the cherries and then gingerly, using an offset spatula, smoothed it out and made sure the corners had cake.

The cake baked in a 350 degree oven for about 60 minutes.  The cake turned a deep brown and when poked to test doneness, lots of steam from the cherries escaped.  The smell was heavenly.  I removed the cake and let it cool on a rack for about 45 minutes.  Then it was time for the last tricky bit.  I didn’t have any flat plates or platters, so I used a cutting board.  I placed the cutting board over the cake, scooted it toward the edge of the counter (the pan was still quite warm – I had to keep oven mitts on), grabbed it toward the middle of opposing sides and quickly flipped it over.  Gratifyingly, it easily slipped out of the pan and stood there looking very proud of itself.  The caramel had oozed onto the cherries and into the spaces between.  The top was a gleaming dark, dark burgundy color and the cake was a lovely, moist bed with cherry juice dripping down.

With all that accomplished and turned my attention to the dog, Gyro.  He would have preferred that I didn’t because the attention manifested itself as a bath.  Actually, he got bathed with two different medicated shampoos and then had a crème rinse.  Personally, I would have loved that kind of pampering.  Gyro didn’t seem to share that sentiment.  Poor itchy dog.

Once I recovered from the bathing process, got myself bathed and dressed, my husband and I fed, Cass returned home.  We now tackled the cookies.  This was a great recipe.  Really easy to throw together…after the creaming of the butter and sugar everything just gets dumped in.  We had a couple of half-sheet pans lined with parchment paper and, using a small scoop, dropped cookies onto the sheets.  A quick bake and they were ready.  This recipe produced some lovely, chewy cookies.  The oatmeal seemed to give them a very tender texture and the combination of chocolate and peanut butter…well, how could you go wrong.

Once cooled we packed all the goodies up and I drove Cass to Emily’s house (Cass has know Emily since junior high school).  The party was organized for their friend Rebecca – one of Cassie’s closest friends. She has known her since third grade.  I was convinced to pop-in and say hello before disappearing (okay…it didn’t take much convincing – it’s fun to see those little girls I knew all grown up).  Based upon the empty containers I received back later, I think the baking adventure was quite a success!

Cherry Upside Down Cake Recipe

Preheat oven to 350F.  Butter a 9X13″ cake pan, preferably non-stick.

Caramel

  • 3 ounces (6 tbl) butter
  • 8 ounces (1 cup) granulated sugar
  • 3 tbl lemon juice
  • 2 1/4 pounds sweet cherries, pitted (about 6 cups)

Melt the butter over medium heat (keep the heat fairly low so butter doesn’t burn or brown…just melts), then stir in the sugar and lemon juice.  Turn the heat up slightly and bring to a boil (keep mixing and WATCHING).  As it boils it will eventually (about 5 minutes) turn a rich amber color.  Once it turns amber remove the pan from the heat and pour the caramel into the prepared pan.

Place the cherries, in a single layer, on top of the caramel with the pitted sides up (so the top will look pretty).

Cake

  • 13 1/4 ounces AP flour (2 1/2 cups)
  • 1 1/2 tsp ground cinnamon
  • 1 1/2 tsp baking powder
  • 3/4 tsp baking soda
  • 3/4 tsp sea salt
  • 9 ounces unsalted butter (2 sticks plus 2 tablespoons)
  • 12 ounces granulated sugar (1 3/4 cups)
  • Zest and juice of one orange
  • 3 large eggs, separated
  • 1 1/2 tsp pure vanilla extract
  • 1 cup sour cream

Whisk flour, cinnamon, baking power, baking soda and salt together.  Using a mixer with paddle attachment, cream butter, sugar and orange zest together until light and fluffy.  Add egg yolks one at a time and allow to incorporate (scraping down the sides of bowl).  Then add orange juice and vanilla.  Add the flour and sour cream, alternating 1/3 flour mix, 1/2 sour cream, repeat and finish with flour mix.  The batter will be quite thick.

In a clean bowl, whip the egg whites until stiff peaks are formed.  Fold half the whites into the batter and incorporate completely.  Then fold the remaining whites into the batter.

Carefully pour the batter over the cherries, trying not to disturb the cherry arrangement.  Smooth the batter over the cherries with an offset spatula making sure the batter completely covers the cherries and is evenly distributed.

Bake for 60 minutes or so.  The cake should turn a nice golden brown and spring back when pressed.  The internal temperature should be at lest 190F.  (The cake may crack from the escaping steam from the cherry liquid but don’t worry about it since you’ll be flipping the cake.)  Let the cake cool on a rack for 45 minutes.

Now the slightly tricky bit.  Place a flat plate, platter or chopping board on top of the pan.  The pan will still be pretty hot so make sure to use oven gloves or pot holders.  Hold the pan and plate firmly together in the middle of opposite sides and gingerly rotate your wrists, turning the whole thing upside down.  Lift the pan straight up and the cake will slide right out and you should be staring at a beautiful sight!

The cake will keep up to 3 days wrapped in plastic (after it has cooled completely).

Chocolate People

You may think this is a post about people who love chocolate and you won’t be entirely wrong.  But this post is actually about making people – even people you love – into chocolate.  This is a very fun project and it gets great reactions from everyone.  There’s nothing like, for example, eating your sister’s face (or, so my son informs me).

This can work with any good quality chocolate.  Chocosphere is a great chocolate resource where you can get pretty much any chocolate made around the world.  I favor Guittard and Valrhona.  Guittard A’peels work well too.

  1. Find a picture of your subject.
  2. If you have the ability to crop pictures (Adobe Photoshop or Elements, for instance) you can get a nice close up a face.
  3. Reduce the coloration so that you only have two-four colors.  In effect, posterizing the picture.
  4. Size the cropped face to whatever dimensions you want your end product to be.  For my daugher (pictured), I made the image about 3″ square.
  5. Replicate the face several times on a single sheet either by using Photoshop (create an empty 8″X11″ document and then copy the layer with your prepared image into it multiple times) or using a photocopy machine (cutting, pasting and copying to get as many as you wish)
  6. Place the multi-image page on a half-sheet pan or other suitable (i.e., washable) surface.
  7. Cover the page with plastic wrap.  Smooth it out as much as possible so you have no wrinkles.  You will be using the plastic wrap as the surface on which you build the face.
  8. Prepare as many  parchment paper pastry cones as colors you will using.  (Pretty good instructions for this here.)  Do not cut a hole in the bottom yet.
  9. Melt the darkest chocolate and fill one of the cones.  The easiest thing is to hold the cone in your non-dominant hand.  The parchment paper cone is pretty stiff so it should be easy to fill with a spoon or just pour from the container.
  10. Cut a teensy-tinsy hole in the parchment cone.
  11. Now the fun part: carefully outline the features with the melted chocolate.  If you find using the cone too cumbersome, you can use a fine watercolor brush.  Keep a pan of simmering water with a half-sheet on top so you can re-melt the chocolate on the brush.  Give the chocolate 5 minutes or so to harden a bit.
  12. If you’re using more colors, do the next level of details.  Bear in mind you’re working in reverse.  The chocolate you put down first will be the color that’s in front.
  13. Lastly, melt some white chocolate.  Since the white will be the background for the chocolate drawing you can either spoon it on and spread or use a parchment cone with a slightly larger hole cut.  Or a combination of both.
  14. Let the chocolate harden for at least 10 minutes.  Gingerly touch it with a finger.  If it’s still soft…wait longer.
  15. Now just peel your faces off the plastic!  You’ll be eating faces in no time now!

I will tell you that my daughter was delighted to be immortalized (or briefly rendered depending on how long you can hold off eating the face).  My sons are jealous and I’ve promised to do them too.  In fact, I can envision a whole chocolate family and then a weird face eating party of some sort.

Flank Steak on the Grill

I recently got a grill.  I never had one but lately it seems like everyone is touting grilling stuff.  Bobby Flay.  Mario Batali.  Alton Brown. We live in a townhouse and have a very small “yard.”  I’ve managed to squeeze in a nice container garden but there’s just not enough room to fit a regular size grill.  But Weber came to the rescue.  They now make the Q series of grills.  I got the Weber Q320.  Not only is it very cute but, as it turns out, it’s highly rated in all the places I checked, it can cook enough for 8 people (or so they claim), comes with a stand and is able to take a full-size propane tank.  And, it fits quite neatly a little space between my trash cans and a hedge.  It’s like it was made for me.

It arrived quickly and I started putting it together.  How hard could it be?  I had gotten as far as getting the wheels on when my husband came home.  He gave me the “there, there, little lady…step aside” look and took over.  Who am I to argue with a big, strong manly man?  With surprisingly little teeth-gnashing or cursing the grill was assembled and I was in business.

Since then, I’ve been grilling up a storm.  I really, really like the taste of food made on the grill.  I even make pizza on the grill now (see Pizza on the Grill – SSSmokin’) – it’s great.  Part of the fun is not being very experienced with grilling – I can experiment and there’s a good chance it’ll turn out fine.  Last night I had a flank steak that had been hanging around with no purpose in life for a week or so.  I figured now or never.  I had neither the time nor the inclination to braise or stew but, I thought, a marinade would do the trick.  The very word sounds so jolly.  Something you might read in a book about elves and fairies.  “They gleefully marinaded around the ancient tree.”

Anyway, I consulted a few sources on the Internet and my bookshelf but nothing quite seemed right.  So I drew from what I saw and threw together the following (measures are approximate):

  • 1/4 cup olive oil
  • 1/4 cup honey
  • 2 tsp salt
  • 2 cloves of garlic, smashed
  • 2 tbl. cider vinegar

I whisked it together, put the approximately 1 1/2 pound flank steak in a ziploc (I cut some slits in the meat to let the marinade get in), poured in the marinade, sealed it with as little air as possible and put it in the frig to marinate (if it wants to dance a little in there, so be it).  I had also read about Bobby Flay’s Perfect Fries and knew my husband would love that so I cut up a couple of potatoes and put them in water to soak (supposedly removes some of the starch).

I left the steak in there about 45 minutes, then turned on the grill to heat.  I also started the oil heating on the stove.  I figured I could cook the steak and while it rested, I would make the fries.  I pulled the steak out (I had turned it a couple of times to make sure it came in contact with the marinade) and liberally salted and peppered both sides.  The grill temperature was up to about 450 and I place the steak on.  It made that lovely hissing sound.  I cooked it about 3-4 minutes per side…it was pretty thin.  I checked the internal temperature and it was about 130…a little low but I was going to let it sit, tented, while I cooked the fries so I figured it was ready.  Took it into the house and tented it with foil.

The oil was now at 325 (as directed) and I fried the potatoes in two batches until they were limp’ish (as directed) and then took them out and put them on a wire rack inverted over paper towels (an idea from Alton Brown’s book I’m Just Here for the Eats).  Then I cranked up the heat under the oil until it reached 375 and fried the potatoes again.  I left them in until they were quite brown and crisp-looking.  Removed them with the skimmer and put them on the rack again.  Crisp “looking” is the operative term.  They were actually VERY limp.  And I was VERY disappointed.  I love my crisp.  Crisp.  I wanted crisp.  Ah well…at least, they tasted pretty good.

While the fries were undergoing their second frying, I quickly picked some lettuce from my garden and whipped up a quick vinagrette:

  • 1 tbl. balsamic vinegar
  • 1-1 1/2 tsp salt
  • couple of grinds of pepper
  • 1 tsp sugar
  • 3-4 tbl olive oil

I whisked the little puddle of vinegar, salt and sugar while slowly dribbling in the oil so that it emulsified.  Quickly chopped a tomato and voila…salad!  I sliced the steak on the diagonal into fairly thin slices, plated it all up, added a couple of slices of ciabatta that I had made the day before and dinner was served.  The steak was fantastic…really.  The marinade really did the trick.  The fries were unfortunate in their limpness but they went well with the rest of the meal.  And, of course, we finished up with the ever delightful leftover Strawberry Blueberry Magic Cobbler.  If you gotta eat leftovers…that’s the way to go!

Ciabatta and Challah

Although still a bit behind others in the BBA Challenge, I’m beginning to catch up to the front-runners (not that it’s a race but it’s fun to be baking the same thing with a group of people).  Ciabatta legend has portrayed it as a notoriously difficult bread.  Achieving the proper holes critical to deeming it truly ciabatta.  And, I don’t know about you, but everytime I hear the word ‘ciabatta’ – even in my head – I hear it as ‘chi-BAH-ta chi-BAT-ta chi-BAT-ta’ – like a little dance tune – like Robin Williams saying, “maDONna maDONna maDONna” in ‘The Birdcage‘.  Probably just personal demons.

I approached the baking of the ciabatta with due caution and respect.  And a litle fear.  Who wants to end up with failed ciabatta (chiBAHta chiBAHta chiBAHta…sorry, I’ll try to stop)?  Many of the BBA challengers have posted wonderful pictures of their successful exploits.  Beautiful holes, golden crust, some have even been stuffed with the likes of caramelized onions and mushrooms (my stomach just grumbled at the mere thought of such delectables).  Now the moment had come.

I carefully read the instructions in The Bread Baker’s Apprentice several times.  Reviewed the pictures of the ‘stretch-and-fold’ maneuver.  Made sure my couche cloth was near at hand.  I was ready.

I had decided to do this bread entirely by hand (rather than using my mixer and dough hook).  In fact, I’ve been thinking of doing all breads this way from now on.  I think some of my previous difficulties like The Great Bagel Disaster and Casatiello may have their roots in relying too much on the mixer.  I have found that mixing by hand I have a much better feel for the dough (pun intended – sorry).  It’s also a slightly slower process so it’s easier to keep the dough in control.  With the mixer, there’s a tendency (on my part, at least) to feel I have to add more flour in order to get the dough to clear the sides.  But, often, I end up adding to much flour and resulting in a very stiff dough.  And once it’s stiffened up like that it’s next to impossible to re-hydrate it enough to become a lovely, pliable mass of dough.

Biga - cut up and warming to room temp

Biga - cut up and warming to room temp

The biga had been made the afternoon before and had about 15-16 hours of fermentation in the frig.  It looked quite puffed up when I took it out and cut it up into smallish pieces and it felt nice and soft.  I was a little concerned about doing the biga version (rather than the poolish one).  It seemed like adding lumps of dough to create a very wet dough would just result in lumpy dough (I speak, unfortunately, from experience).  But, from reading others experiences, it seemed that the biga was working out better hole-wise.

While the biga rested I decided to bake some Challah to take to our very good friend’s house that day.  Ellen loves Challah.  I had made the BBA Challah and it was pretty good but I found it a little drier than I like so I hunted around for another recipe and found this one.  It’s not that different from the BBA one but uses slightly less water, slightly more honey and egg.  And it’s fun to experiment.  I also did this one by hand.  
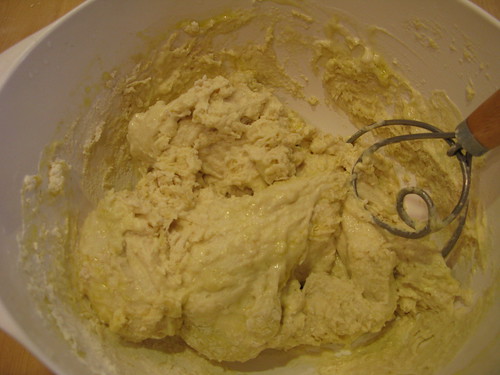
I mixed the dough up in a bowl using my dough whisk.  If you don’t have one of these babies, get one.  It makes mixing up even fairly heavy doughs by hand a snap and cleans up easily.  It’s great for lighter batters and such as well.  The dough quickly came together, turned out on my board, kneaded it for 5 minutes or so and it was ready for it’s first rise.

Then it was time to walk the dog and do a quick errand.  By the time I was back the biga was warmed enough to get going on the ciabatta (chiBAHta chiBAH…sorry, sorry).  I placed all the ingredients in a bowl adding the cut up biga.  Using my dough whisk, I quickly had a shaggy mass of dough.  According to instructions, I had a bowl of water nearby.  Dipping my hand in the water first, I used my claw, er, hand to knead the dough kind of like a dough hook would while turning the bowl.  I kept dipping and kneading until I had a nice, uniform and VERY wet dough.  It was kind of fun doing the whole wet hand mixing thing.  Like making mud pies.  Only slimier.

Once it was feeling good (pliable, smooth and, most importantly, wet), I made a little bed of flour on my board, dumped it out and formed a rectangle.  Now was the time for the first stretch-and-fold.  I was a little trepidatious but it was really easy.  The dough was very compliant.  I floured it and me well, carefully loosened it with a bench scraper and lifted each end.  Lo and behold…streeeeetch!  The folding part was a piece of cake…or bread.  Set it to resting and proceeded to shower and dress.  Once properly put together for the day (or as good as it gets for me), the ciabatta was ready for it’s next exercise period: streeetch-and-fold.  Back to resting.

After another 30 minutes or so, the ciabatta had risen A LOT.  It was a little scary how big the lump had gotten.  I figured this was signal to go ahead and shape it.  I had prepared the couche with lots of flour.  I cut the heap’o’dough into 3 pieces and easily shaped them into rectangles, placed them on the couche and rucked it up between them to form a nice, comfy coach…er..couche.  I puttered around a bit, tweeted, checked email.

The challah had swelled fairly nicely by now (it had been about 2 hours).  It didn’t really look doubled to me which was surprising as it was nicely warm in the kitchen but that’s how it goes sometimes.  I made an executive decision that it was ready for shaping.  And shape it I did.  I decided on two loaves as I wanted one for Ellen and the other to take to my mother.  She, my mother, had complained that I hadn’t brought her any of the other challah so I hoped this would make her happy (or as happy as my mother gets).  After wrestling with the braiding, I got them nicely shaped.  I don’t know why the braiding is so hard…I have no trouble braiding hair.  (I actually think I may have figured it out during a dream…so we’ll see next time.  And why I’m dreaming about making bread rather than hunky men I don’t know but it’s very disappointing.)

My husband returned from his workout and proclaimed his imminent starvation.  Since I wanted to bake the ciabatta before going anywhere I got him to put his tummy on hold for an hour.  I figured I could refrigerate the challah braids and bake them when we came back but I didn’t want to the ciabatta to wait and it bakes really quickly.  I decided, since I had three pieces, to experiement a bit.  So I heated up my stone in the upper oven and my La Cloche in the lower oven.  If you haven’t seen the La Cloche you should check it out.  It’s a great substitute for an oven hearth.  I was really curious to compare and contrast.

Once the ovens were heated, I floured my Super Peel (another REALLY handy item) with semolina and transfered two of the loaves to it.  Again, it was quite easy although the dough is quite soft.  Just a bit of help with the bench scraper and they were on the peel.  From there it was easy to transfer them to the hot stone in the upper oven, dump a cup of water and close the door.  The third loaf was transferred to the re-dusted peel and this one was placed in the La Cloche.  It was a tiny bit long for the round base but it smooshed itself into a slight curve which was fine with me.  I replaced the cover and closed the door.  Spritzed the upper oven a couple of times.  And let them all all bake.

In just 15 minutes all three had reached the requisite 205 degrees and were ready!  It was quite interesting to see the difference in color between the two.  The ones done in the oven on the stone were pale golden colored.  The one in the La Cloche as a much richer gold.  I left them to cool (even though hardly able to wait to see the inside), stuck the braids of challah in the frig and we were off to lunch and errands.

The La Cloche baked one is on the right

Returning home the moment of truth arrived.  I sliced one of the stone made breads and it looked good but, alas, no big holes.  The texture was quite nice and the taste was good although a little bland.  Then I tried the one made in the La Cloche and, I think, there was a significant difference.  The texture was MUCH more open.  No huge holes, but lots of medium size ones.  The taste was similar to the others but the texture was lighter, less chewey.  All-in-all I’m calling them all a success.  I really enjoyed making them.  Working with the wet dough was a lot of fun and actually quite easy.  And I’m eating ciabatta dipped in a little olive oil as I write.

Stone Baked Ciabatta

Stone Baked Ciabatta

La Cloche Baked Ciabatta

La Cloche Baked Ciabatta

And the challah?  They had huge oven spring.  They looked beautiful coming out of the oven.  We left shortly after for Peter and Ellen’s (to spend 4th of July lolling at their pool) and Ellen’s challah was still warm when we got there.  She received it delightedly and tore into immediately.  I must say that once I got a look at it (after prying her fingers off the loaf and making her stop shouting, “mine, mine”) that it was a significantly fluffier texture than the BBA challah.  The taste was excellent, a little more egg-y and sweeter.  Now I may have to try others or experiment with these because leaving well enough alone is just no fun at all.

Blueberry Fever!

Strawberry Blueberry Magic Cobbler

There have been so many wonderful posts and recipes going around the blogosphere for various ways to transform lovely blueberries into heavenly concoctions that I can’t resist!  Leaving aside the Nightmare in My Closet, I am throwing caution to the wind, putting my foot down, taking a stand (and other similar cliches).  I love sweets, I love blueberries and, damn it, I’m eating the wonderful bounty that nature, careful genetic breeding and copious quantities of sugar provides.

I had wonderful success with the Blueberry and Strawberry Buttermilk Cake from Pinch My Salt.  It was a key element in my Unplanned Dinner.  I don’t think that post really did it justice.  It is a very simple cake to put together.  And the quantities called for make a small cake which is nice when there’s just two of us.  With great restraint we finished it off over two days (rather than just eating it all at one sitting which is what I really wanted to do).  Each mouthful was delicious.  It’s hard to beat the combination of blueberries and strawberries and the cake was not at all sweet which really let the berries shine.

Now that I had tasted this creation I was eager to see what else I could make.  I have a weakness for cobblers and crumbles (buckles, trifles and fools as well).  While this may be sacriligious to say, I often much prefer fruit based desserts to chocolate ones.  I know, I know… heretical.  But there it is.  So, after surveying the territory of blueberry creations and finding LOTS of fabulous sounding ones, I opted for one that sounded very simple to put together and emphasized the berries.  The title of it,  Strawberry-Blueberry Magic Cobbler on the Eating Out Loud blog appealed to me because, well, it has ‘Magic’ in the name so it must be good!  Plus the author gave lots of kudos to his mom which I always think is important.

Like the Buttermilk Cake, this dish went together VERY easily.  It really was magical.  I’ve come to really like recipes that don’t require using heavy equipment.  In some ways, it’s just a lot more fun to mix the stuff by hand.  I’ve been finding the same thing with my bread making.  I prefer to knead the dough by hand.  I get a much better feel for what’s going on and things don’t get away from me so easily.

Blueberry Strawberry Buttermilk Cake

This cobbler, which is really more like a buckle/crumble but let’s not be too technical, came together literally in minutes.  Cutting up the strawberries took longer than mixing up the batter.  The author suggested just melting the butter in the pan as the oven heated, so I did.  Quickly mixed together the usual suspects: flour, sugar, salt, baking powder, cinnamon with milk to form a very loose batter.  Pour (literally…it’s really soupy) the batter into the pan with the melted butter.  Evenly spread the berries on top of the batter, followed by sprinkling brown sugar and walnuts (the recipe called for pecans…I had walnuts…worked fine).  Pop it in the oven for 45 minutes or so.  And that’s it!

I must admit I was a little dubious when I saw how watery the batter was.  But I figured I couldn’t go that far wrong with all the fruit and sugar!  And, boy, was I right.  After 45 minutes, maybe a smidge less, the gloop had turned into a beautifully browned cobbler (buckle, crumble).  It looked amazing.  Smelled amazing.  Had to restrain myself from digging in right then.  Instead, served up dinner for me and the hubby while it cooled.

Dinner behind us it was time to give it a try.  I served it up with whipped cream (from my handy nitrogen-charged canister I keep in the frig for any whipped cream emergencies).  As you may have already guessed, it was fabulous.  Similar in taste to the Blueberry and Strawberry Buttermilk Cake (after all, it had the sam berries) but the brown sugar and walnut crumb on top really added a nice dimension.  My husband, the house food critic, gave it a gleeful thumbs up.

Both these recipes were really excellent and we loved the results.  The cake is a little more substantial feeling in the mouth.  The cobbler is more light and heavily fruited.  I will be making both again.  And again.  And again.

When Good Dinner Plans Go Bad

I had a wonderful plan for dinner last night.  I had some chicken kebobs all put together and ready to be thrown on the grill when I got home.  I wanted to make the Blueberry and Strawberry Buttermilk Cake that was posted on Pinch My Salt (thanks Nicole!) as a perfect summer dessert.  I figured I’d pick some greens from my little container garden so we’d have a salad.  It was a beautiful plan.

That’s when reality stepped in.  After visiting a bit with my husband, I was ready to set the plan in motion.  I went outstide to turn on the grill so it could heat while I prepared the batter for the cake.  And, you guessed it, it wouldn’t light.  I think I may have inadvertantly left the gas turned on a tiny bit so there wasn’t any.  I fruitlessly pressed the ignition button several times…nothing.  Grrrr.

Okay…now what’s for dinner?  I didn’t want to try grilling the kebobs indoors…they really cried out for a real grill.  Hmmm.  Well, I figured we could still have the planned dessert.  I put together the batter while thinking about what else to make.  It’s a lovely, simple recipe and the batter came together easily.  I put it into a square pan (rather than the round pan suggested) and popped it into the oven.

Meanwhile, I had figured out an alternate entree.  I had some skinless/boneless chicken thighs in the frig waiting for an idea.  I quickly lined a quarter sheet pan with a couple of layers of aluminum foil and layed out the thighs.  A liberal sprinkling of salt, some pepper and lavish paprika.  Then I dotted each with a dab of butter.  I placed the pan under the broiler for about 5-6 minutes.

During this lull I contemplated side dishes.  I popped out to the “garden” (I have a tiny yard with a bunch of containers holding tomato, cucumber, pepper, butternut squash, lettuces and herbs) and picked some lettuce and a nice little cucumber.  Okay, salad taken care of!  Then I remembered two things:  1) I had some cooked rice that I had frozen in the freezer (Mark Bittman had a great article on freezing stuff) and 2) I “forgot” to put the berries on top of the cake.  Yes, that’s right, the berry cake was berry-less.

I checked the cake (it had been baking for about 15 minutes) and it was still very soft so I went ahead and put the berries on top and kind of smooshed them down a little with my hand.  This is what comes of reading a recipe too fast…you might miss a thing or two.  Back in the oven it went.  Within a minute or 3, I remembered I hadn’t sprinkled with sugar…so, opened the oven, grabbed a spoonful of sugar and sprinkled.  Sheesh.

I turned the thighs, sprinkled with more salt, paprika and butter.  Back under the broiler for another few minutes.  By now I had placed the frozen rice into the microwave and it was, theoretically, defrosting.  When I opened the microwave to pull it out I learned an important lesson: don’t touch really hot, steamy stuff with your bare hand.  Boy that was hot.  I pulled the mostly defrosted rice out, sprinkled it with salt and pepper and a little olive oil, mixed it well with a fork and put it back in to heat through.

Now the cake and the chicken thighs were done and both were removed from the oven.  The cake to cool on a rack and the thighs to rest.  While the thighs rested, I made a quick oil and vinegard dressing for the salad (basically I just plated the greens and some cucumber slices, applied a little salt and pepper and drizzled with olive oil and a touch of cider vinegar.  Then I sliced the thighs cross-wise and added that and the rice to the plate.  While the cake cooled, I served up our little dinner.  I briefly explained the whole plan snafu thing to my husband and, after tasting the thighs, said that my “alternate plan was better than most people’s plan.”  He’s a keeper.

Once dinner was finished, the cake was cooled.  I dished each of us a piece and garnished with whipped cream (have I mentioned that I keep a nitrogen charged canister with cream at the ready in my refrigerator?).  The cake was delightful.  The berries had only sunk in a bit but that was actually fine.  The late addition of sugar created a nice little patina on the top.  My husband’s verdict?  “I could eat this everyday!”

Nightmare in My Closet

You’d think you’d be safe in your the privacy of your very own closet. In fact, Gyro (our much loved Corgi), spends a great deal of his time in there. We refer to him as ‘Closet Dog.’ Given Gryo’s un-courageous personality, I figured the closet is pretty-much the safest place in the house. Unfortunately, I keep the scale in there.

Most days I ignore it or throw it a dirty look or give it a little kick (just to show who’s in charge). Every now and then, if I’m feeling very confident and, well, light, I’ll gingerly step on. But if it looks like things aren’t going my way I just as gingerly hop off. This morning it was laying in wait.  I could hear it whispering, “C’mon…you look a little thinner…i’ll be kind…don’t worry…”  Freakin’ viper.

Of course, I knew all this bread baking, cookie making, recipe experimenting and maybe a little bit too much crap-snacking at work might have led me to eat a teensy-tinsey bit more than usual. (I define teensy-tinsey as more than twice as many calories as required. Why? How do you define it?) And I have the occasional feeling that my clothes have shrunk or been replaced by evil gnomes with clothes a size or two smaller. (Gnomes being the only reasonable explanation I could think of.) Today, though, some evil part of my brain said, “C’mon…you should just check and see if you’ve picked up a couple of pounds. It’ll be fine…” And, like an idiot, I listened to that voice.

After the screaming, teeth gnashing and tears abated I realized that I had some choices:

  1. Ignore the whole thing. Who’s that scale to tell me how to feel about my body?
  2. Go on a diet. After all there are probably one or two diets I haven’t tried yet.
  3. Focus on eating only “healthy” foods in moderate amounts. This should be a piece of cake (oops celery?)…right?
  4. Embrace my roundness. Assuming my arms will reach around.
  5. Figure out how to keep eating the things I love. Hmmm…isn’t that how I ended up here?

As may be obvious, I’ve struggled with “weight issues” all my life. I was a slightly chubby kid, who grew into a slightly chubby woman. I’ve been susceptible to the hunt for the “right” diet forever. I have been on pretty much every diet there is: low calorie ones, low fat ones, low carb ones, South Beach, Ab Diet, Hawaiian…you name it and I’ve either tried it or know about it. I’ve tried resigning myself to my body. This is who I am. A short, roundish woman. Sort of like a teapot. I’m never going to have long legs. Lithe torso. Skinny arms. Just writing that makes me want to run screaming into the streets berating the gods for sticking me in this plump pot.

And, sadly, making the mistake of putting my tootsies on that stupid scale pretty much ruined my mood. Instead of feeling my usual chipper self I entered a darker corner of my mind. Inner conversations that berate and ridicule. Empty promises of resolution and abstinence. But, to be honest, I’m just tired of the whole thing. I enjoy cooking and baking and eating. I enjoy thinking about it. I enjoy doing it. I find the whole process of reading about food, recipes, techniques and then trying them and, of course, tasting and sharing the result, to be very fulfilling. (Yes, maybe a little over-fulfilling.)

After reviewing the list of choices, I think #5 is my only real option. Yes, I can figure out ways to “lighten” recipes as long as I don’t have to sacrifice quality. I can continue to work on my body issues and emotional eating behaviors. And I can refuse to let the scale or the world-view it represents dictate how to feel about myself.

At least I can try. There’s a good post at A Tiger in the Kitchen about similar issues. Any thoughts from you would be helpful and are very welcome!